Approximately one in three email users worldwide use Gmail according to research by Oberlo. With many professionals now using Gmail, organizing Gmail inbox can prove a vital skill for increasing productivity and efficiency at work.
Gmail is a popular email service that users can access on PCs, cell phones, tablets, and other devices. On average, a user gets about 32 emails a day on Gmail, according to DragApp.
It is crucial to organize your Gmail inbox to stay on top of all these communications. Knowing how to organize Gmail inbox lets you prioritize messages, respond quickly to urgent communications, and focus on multiple projects.
In this blog, we’ll provide 15 easy tips on organizing your Gmail inbox to streamline your workflow and boost your productivity.
Why is organizing your Gmail inbox important?
With features such as multiple account support, advanced search, filters, and canned responses, Gmail is one of the best productivity tools in the market. It is, therefore, safe to say that Gmail is like the online version of your home mailbox.
According to Statista, 27% of global email communications happen on Gmail.
Your email inbox is the center of your communications in the workplace. It contains client emails, memos, support requests, and conversations with team members.
A well-organized Gmail inbox means you are always up to date with all your communications, you don’t miss important emails, and you work better. Other benefits of an organizing Gmail inbox include:
Increased productivity
Gmail’s priority inbox categorizes emails for you based on their urgency and importance. It boosts productivity by allowing you to quickly attend to high-priority emails, ensuring you do not miss any important messages.
Improved communication
When you effectively organize your Gmail inbox, it enables you to promptly recognize critical emails, swiftly respond as soon as they arrive, and ensure that no significant messages are overlooked.
Knowing how to organize your Gmail inbox lets you improve communication with your team and guarantees that you remain informed at all times.
Better time management
Organizing Gmail inbox saves you a lot of time by eliminating the need to sift through countless emails to determine which ones to respond to.
Reduced stress and frustration
Labels, folders, and filters allow you to set up an orderly system in your Gmail inbox. This makes the process of managing and responding to incoming emails less overwhelming, reduces anxiety, and maintains calmness at work.

Tips on how to organize your Gmail inbox
Most of our inboxes are filled with unread emails. Categorizing, prioritizing, and replying to these emails can be a daunting task.
However, Gmail provides built-in tools that make organizing emails and managing your inbox easy. Here are some on how to organize your Gmail inbox.
Choose a custom inbox layout that prioritizes relevant emails
Gmail has several inbox layouts you can choose from depending on your needs. An excellent way to organize your Gmail inbox is to set up an inbox layout that places relevant emails at the top of your inbox, such as the ones starred or marked as important.
You can prioritize relevant emails by choosing either one of the following layouts:
- Default: This layout organizes your email into tabs, in the order they were sent.
- Important first: Gmail analyses emails and marks some as important, placing them at the top of your inbox.
- Unread first: This layout displays your unread emails at the top of your inbox while the read ones go to the bottom.
- Starred first: Here, your starred emails are shown first.
- Priority inbox: A priority inbox checks the emails you interact with the most and places them at the top of your inbox.
Choosing the right layout can work wonders in organizing your Gmail inbox, keeping it streamlined and clutter-free. Here’s how you can change your Gmail layout to organize Gmail inbox:
- Access the settings by clicking on the gear-like icon in the inbox.
- Click on any of the options on the drop-down menu.
Use labels to categorize emails
Using labels makes it easier to find emails, as you only have to click on the label from the left panel to access the email.
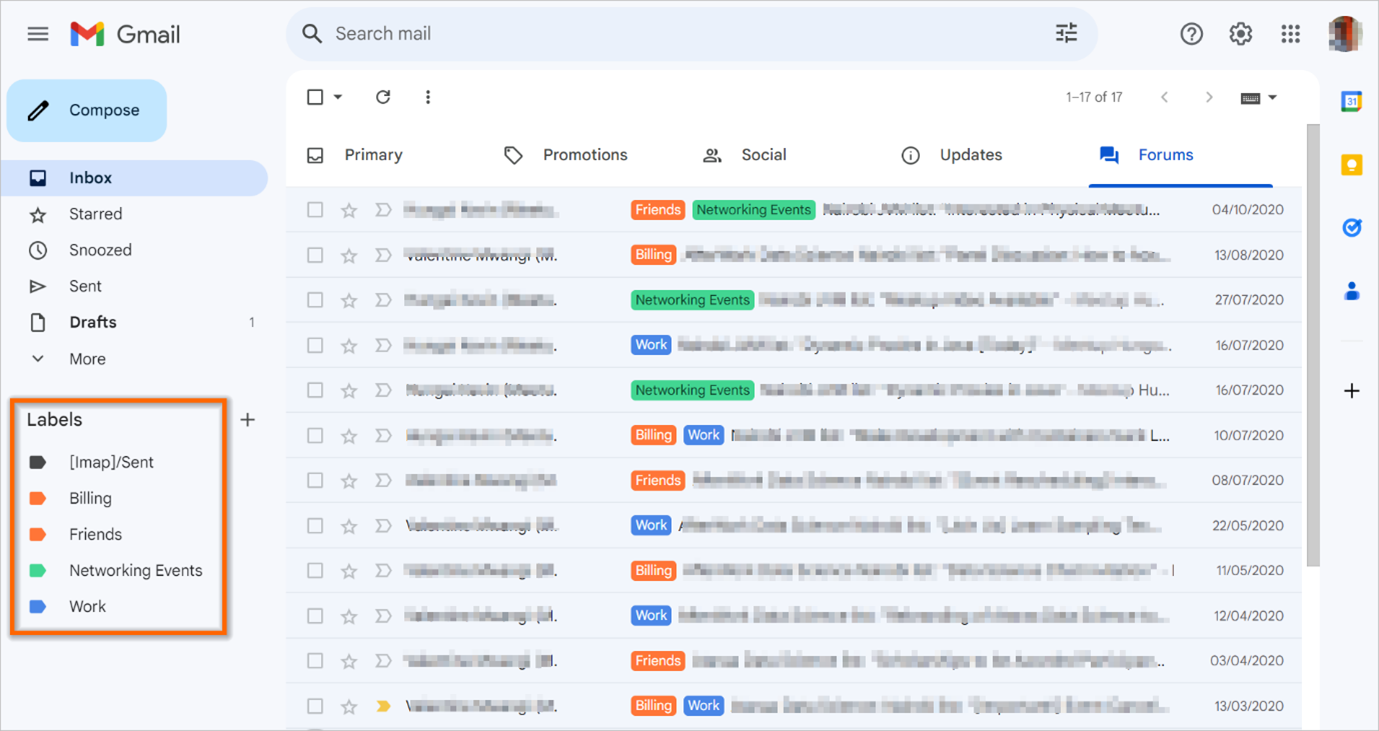
Another cool thing about labels is that you can assign a color to each to make it more visual. Gmail automatically labels successive emails as they arrive.
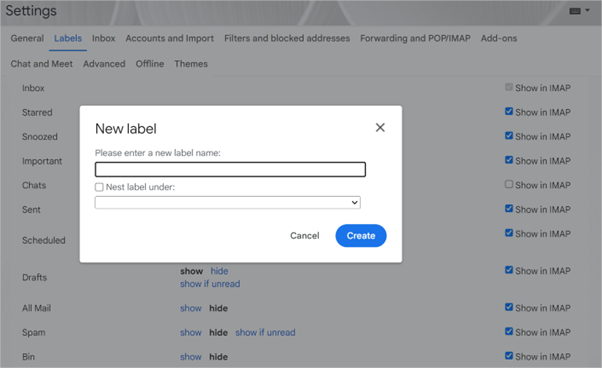
You can also assign more than one label to a single email and search for specific emails within the labels. You can set up a label in the following ways:
- In the Gmail app, scroll down to the left panel, then click More.
- Click on Create new label and add the name of your label.
- Click Create and save the changes.
Sort out your emails with the Gmail filter feature
Gmail uses a filter feature to filter email by subject, content, sender, and more. Filters help you automate tasks such as assigning emails to labels.
You can customize these filters to ensure you never miss crucial email from important contacts. Additionally, you can configure your inbox so that Gmail applies filters automatically to emails that meet the criteria you have set.
You can also use filters to:
- Apply labels to emails.
- Archive emails.
- Mark emails as important.
- Forward emails automatically.
- Sort emails by priority or relevance or to mark them as spam.
Here’s how to set up Gmail filters when organizing Gmail inbox.
- Access settings by clicking on the gear icon at the top of your inbox
- Navigate to Filters and Blocked Addresses.
- Click Create a New Filter, then set the criteria for the filter.
- Select Create a Filter and save the changes.
Do away with tabs you do not need
Gmail has five tabs in total, three of which appear by default. These three are the primary, social, and promotions tabs.
Having all these tabs filled with emails can be burdensome when you only need two or just one. Remove tabs that do not receive many emails to organize your Gmail inbox.
You can remove tabs through the following steps:
- In the Gmail app, open settings and click on the Inbox tab
- Choose the tabs you wish to add or remove under Categories.
- Save changes.
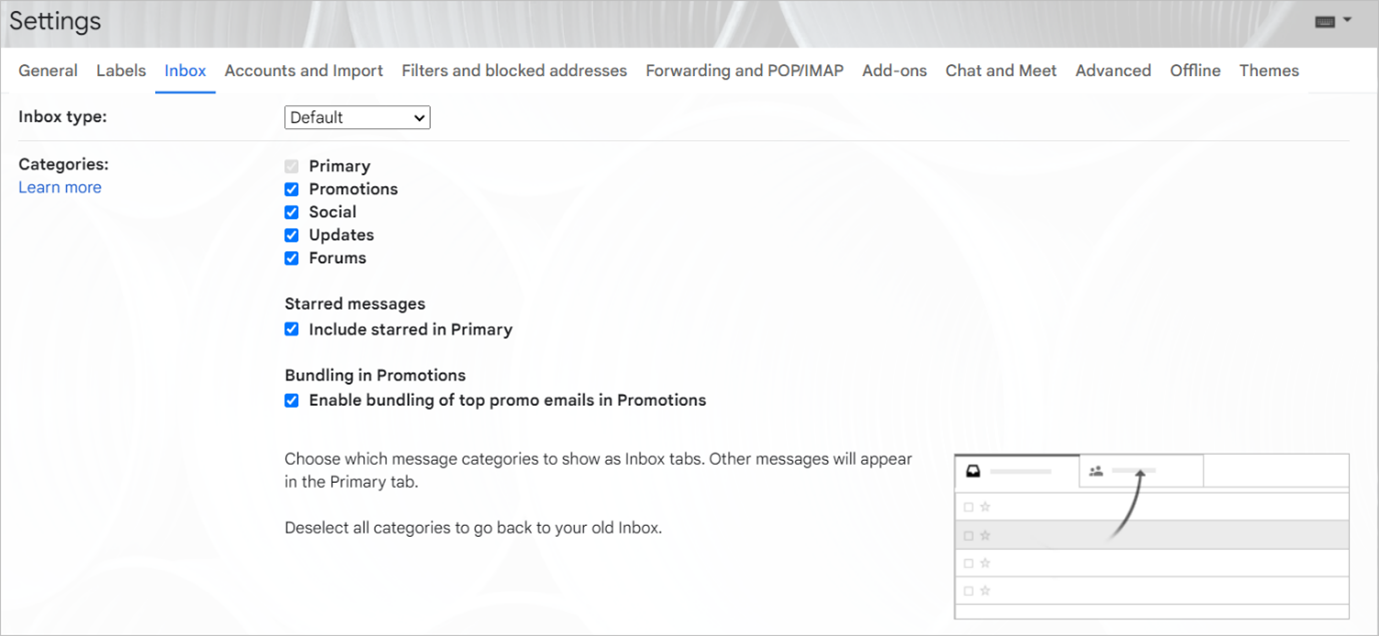
It is important to note that all tabs are removable except for the primary tab. When you remove extra tabs, new emails automatically appear under the primary tab. Therefore, this is a great tip on how to organize Gmail inbox.
Star important emails
Starring significant emails is yet another effective method for organizing Gmail inbox. You can designate emails as important by clicking on the star icon next to the email.
Gmail frequently auto-labels messages as important, denoted by a yellow arrow next to the message. However, this automatic process isn’t always accurate.
By taking the initiative to star emails yourself, you not only ensure they’re readily identifiable, but you also refine Gmail’s algorithm for better precision in recognizing and flagging important emails going forward.
Here’s how to star an email:
- Navigate to the email you want to mark in your inbox.
- Click the star icon adjacent to the email
- To view your starred emails, click on the Starred tab in the left panel of your inbox.

Snooze emails that are not urgent
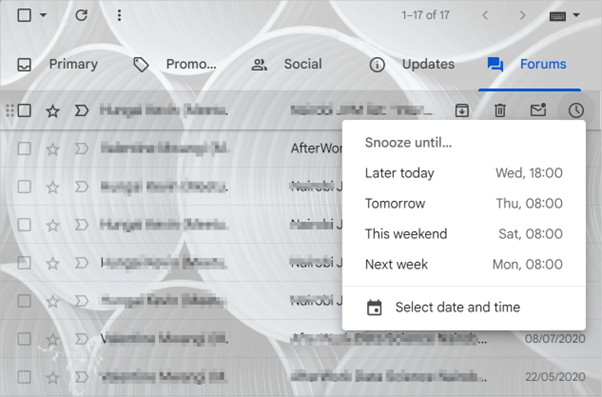
Some emails do not require an immediate response and can unnecessarily fill your inbox. Luckily, Gmail has a built-in snooze feature that lets you temporarily remove an email from your inbox until later, enabling you to organize your Gmail inbox.
When you snooze emails, you clear your inbox to focus on more critical messages. For instance, you could Snooze your bill reminder emails until the time you are ready to pay those bills.
Once the time elapses, the email will reappear in the inbox for you to reply to. To snooze an email, hover on the clock icon on the taskbar and select a time that suits you to revisit the email.
Archive emails that are not important
We usually do not delete email in our inbox as some might be needed later. The problem is that these emails end up piling up in your inbox.
A great way to ensure that the already-taken-care-of emails don’t clutter your inbox is to archive them. It removes unwanted email from your main inbox to create room for important emails while at the same time storing the emails you need for future reference.
You can also enable the Send and Archive button that automatically archives an email after you have responded to it. The archived emails stay hidden until you revisit or search for them.
A good example is whenever you get a purchase receipt via email when you buy something from an online store. The receipts may not be immediately useful, however, they can prove important later on in case of an issue.
You can simply respond to the email and archive it using the Send and Archive button. Here’s how you can archive an email to organize your Gmail inbox:
- Select the email you want to archive.
- Click on the square icon to highlight it.
- Click Archive.

You can use the e keyboard shortcut to archive emails as well.
Unsubscribe from unwanted mailing lists
Reducing the amount of emails in your inbox is only part of the challenge. A significant aspect of organizing Gmail inbox is reducing the number of incoming emails.
There are several emails in your inbox that are a result of subscribing to mailing lists that don’t provide you with anything useful. These unwanted emails can easily distract you.
Unsubscribe from undesired mail lists to reduce the number of emails in your inbox. Fewer emails will keep your inbox tidy and simplify browsing through it.
The unsubscribe option is often found at the end of the sender’s email address or the end of their message. Take advantage of this unsubscribe link to quickly opt out of mailing lists.

Block spam email
Another good tip to organize your Gmail inbox is to block spam mail. Spam emails are unsolicited emails sent to you in bulk from people you don’t know.
If you find unwanted emails in your inbox and consider them spam, you can right-click on them and mark them as spam. Gmail will automatically categorize similar emails in the future as spam, saving you the time and effort of going through unwanted emails.
Mute conversations
Discussions in the workplace can generate a lot of emails in your inbox that may not involve you directly. You can manage such emails by muting the conversations.
All muted conversations are archived and can be accessed later when you search them. Here’s how you can mute a conversation:
- Select the More option in the taskbar.
- From the drop-down button, choose Mute.
- Remove the Muted label from the thread to unmute a conversation.

Set-up desktop notifications for incoming emails
Set up email notifications on your computer to notify you of new emails. This allows you to respond to important emails as soon as they come.
You can also configure your desktop to only notify you of emails that are marked as important so that you do not get distracted by unimportant emails.

Enabling desktop notifications means you are on top of all your conversations and don’t miss crucial emails. When you respond to incoming mail each time you get a notification, your inbox becomes less cluttered.
Here’s how you can set up desktop notifications to organize your Gmail inbox:
- Click on Settings, at the top of your inbox.
- Navigate to Desktop Notifications and click on the radio button to enable notifications.

Enable the nudges feature in your Gmail
Gmail has a feature called nudges that acts as a reminder by showing you emails that you have not responded to on top of your inbox. It also shows you the emails that recipients haven’t addressed.
The nudges feature automatically resurfaces old emails you might have forgotten to reply to and “nudges” you to address them. Nudges help you organize your Gmail inbox by reminding you to reply to emails and follow up on sent messages.
You can set up nudges in the following way:
- In the Gmail app, click on Settings.
- Click on the General
- Scroll down until you see the Nudges option
- Select your desired option and save the changes

Delete emails you no longer need
Another useful tip on how to organize Gmail inbox is to delete emails you no longer need. Deleting emails clears up your inbox for more important emails.
Deleting old emails with attachments is also a good way to organize your Gmail inbox, as Google allocates only 15GB of free space for you to store your data, in Google Drive, Gmail, and Google+. Emails that are deleted are sent to the trash folder where they stay for 30 days before being deleted entirely.
Below are the steps to delete an email:
- Navigate to the email you want to delete.
- In the taskbar, select the bin icon to delete the email.
Set up Gmail templates
Gmail gives you the option to set up custom email templates or canned responses that you can use to avoid composing the same email repetitively. These canned responses help you save time as you do not have to compose an email from scratch every time you respond to an email.
By responding promptly to emails, you can clear the clutter in your inbox, keeping it neat and organized. You can set up Gmail templates and organize your Gmail inbox using the following steps:
- Compose an email you plan to use frequently.
- Click on the three dots at the bottom right corner of your compose window.
- Select Templates.
- Select Save draft as template.
- Select Save as new template.
- Input the template name.
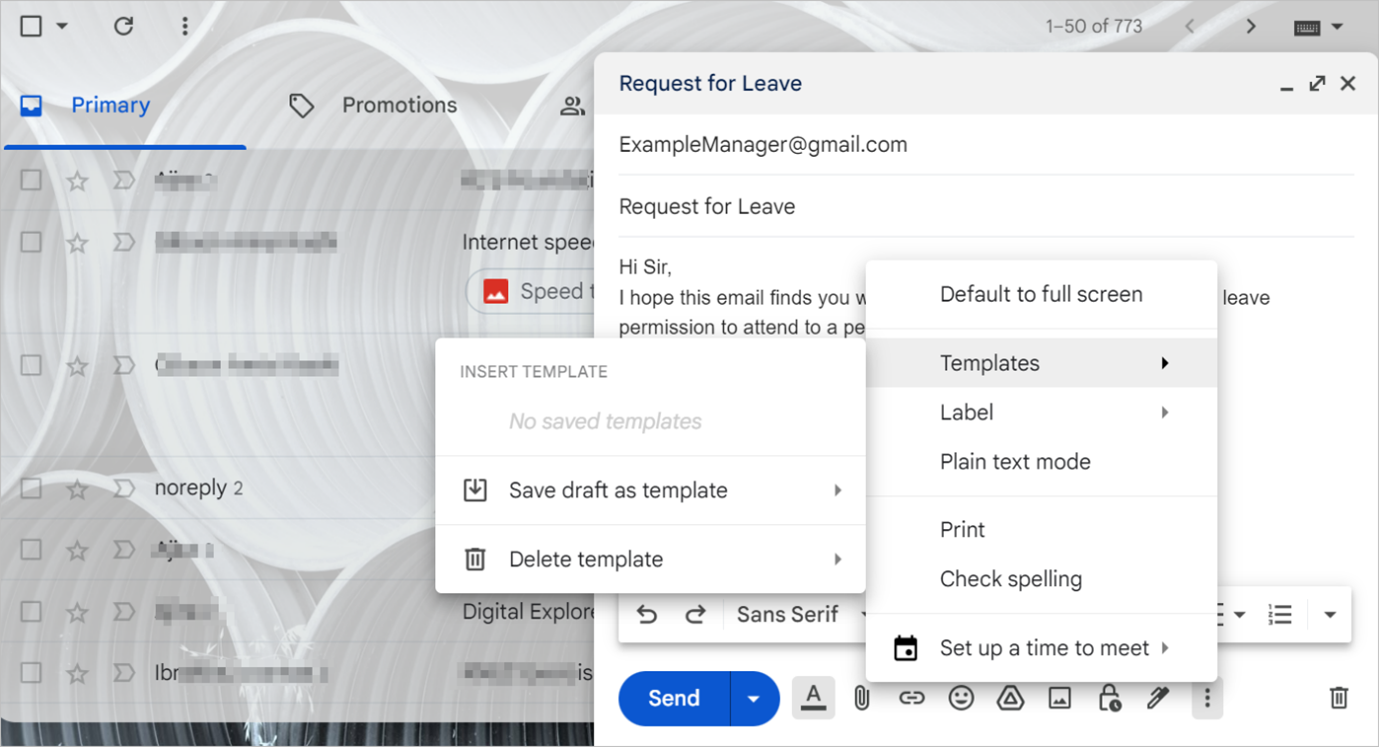
You can then use the template any time you need it in the future. Email templates assist you in organizing Gmail inbox, improving your response time and allowing you more time to be productive.
Use Gmail Smart Reply and Smart Compose
Gmail has a Smart Reply feature that suggests replies for you based on the emails you receive. It provides you with short phrases that you can use to promptly reply to emails.
The Smart Compose feature composes complete replies to your emails instead of just short phrases. It allows you to respond quickly to emails and thus helps you keep your inbox clean
You can enable either of these features by navigating to the General Settings tab and clicking on the respective radio button.
Bonus tips:
Let a colleague organize your inbox while you are away
Emails can pile up in your inbox when you are out of the office, sick, or on vacation. Fortunately, Gmail allows multiple people to use one account through the Gmail shared inbox feature.
This feature allows multiple people to access and use a single inbox. Delegate your account to a member of your team to read, respond to, and organize your emails while you are away. A shared Gmail inbox will keep your emails from piling up and overwhelming you when you return from vacation.
Clean your inbox regularly
It is good practice to constantly go through these steps repeatedly to check or change them so that they can work better for you. To organize your Gmail inbox, you must go through your emails, archiving and deleting the ones you do not need.
Schedule a fixed time to respond to emails so you don’t have a cluttered inbox. Also, respond to emails as soon as they come whenever you can.
Discover how to organize Gmail inbox for better productivity
Efficiency and improved productivity in the workplace begin with an organized inbox. The tools, tips, and techniques shared in this blog will enable you to organize your Gmail inbox, streamline your workflow, save time, and keep you focused on work.
BoldDesk’s shared inbox software improves the productivity of your support staff by enhancing collaboration, reducing response times, and streamlining communication.
Get in touch with us to find out how you can complement your customer service using BoldDesk’s unique tools. Schedule a live demo or sign up for a free trial today to get acquainted with its features.
We hope you found these tips on how to organize Gmail inbox insightful. Please feel free to add any further suggestions and ideas in the comments section below.
Related articles


 Email Ticketing System
 Shared Inbox Software
 Multi Brand Help Desk
 Internal Help Desk Software
 Trouble Ticketing Software
 Mobile Help Desk


